Orchestrate ELT pipelines with Prefect, Airbyte and dbt
Learn how to build an ELT pipeline to discover GitHub users that have contributed to the Prefect, Airbyte, and dbt repositories.


Learn how to build an ELT pipeline to discover GitHub users that have contributed to the Prefect, Airbyte, and dbt repositories.
When discovering insights from data, there are often many moving parts involved. In order to make data available to stakeholders, the data often needs to be extracted, loaded, and transformed (ELT process) on a schedule so that stakeholders have the most up-to-date information. Synchronizing these steps on a schedule can be challenging, but with Prefect, Airbyte, and dbt it's a breeze!
In this recipe, we’ll build an example ELT pipeline to discover GitHub users that have interacted with the primary Prefect, Airbyte, and dbt repositories by leveraging the three tools. All three tools are open source and also offer a cloud platform.
Prefect is an orchestration workflow tool that makes it easy to build, run, and monitor data workflows by writing Python code. Prefect Cloud makes it easy to schedule runs that orchestrate data movement across multiple tools. In this recipe we’ll create a Prefect flow to orchestrate Airbyte and dbt.
Airbyte is a data integration tool that allows you to extract data from APIs and databases and load it to data warehouses, data lakes, and databases. In this recipe, we’ll use Airbyte to replicate data from the GitHub API into a Snowflake warehouse.
dbt is a data transformation tool that allows you to transform data within a data warehouse more effectively. We’ll use dbt in this recipe to transform data from multiple sources into one table to find common contributors between our three repositories.
In order to follow the steps in this recipe you’ll need to make sure that you have the following installed on your local machine:
For this tutorial, you can set up a Snowflake account if you don’t already have one. Snowflake has a generous free tier, so no cost will be incurred while going through this recipe. Airbyte requires some resources to be created in Snowflake to enable data replication from GitHub. You can refer to the Airbyte Snowflake destination documentation for the steps necessary to configure Snowflake to allow Airbyte to load data in.
Download our free guide and discover the best approach for your needs, whether it's building your ELT solution in-house or opting for Airbyte Open Source or Airbyte Cloud.

For this recipe, we’ll use Docker Compose to run an Airbyte installation locally. The commands necessary to run Airbyte can be found in the Airbyte quickstart guide.
Airbyte has a GitHub source that allows us to easily pull the information that we want via the GitHub API. We will set up a source for each of the three repositories that we want to pull data from so that we can have tables in Snowflake for each repository. This is the configuration that we’ll be using for the Prefect repository:
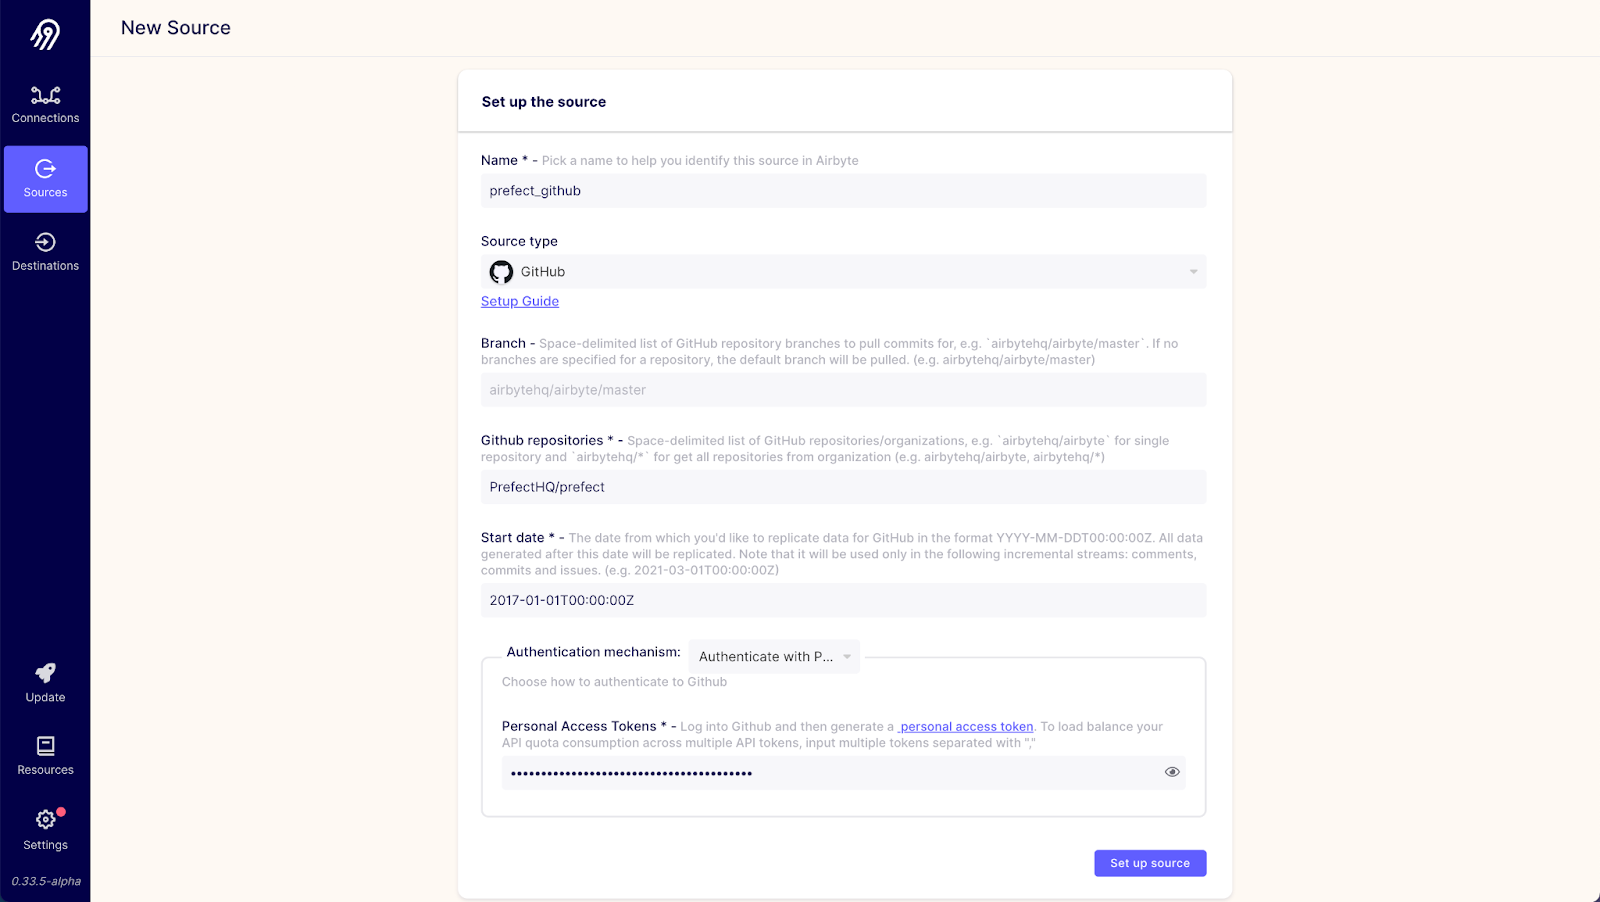
Once that source is successfully configured, we’ll set up two additional sources for the airbytehq/airbyte and dbt-labs/dbt-core repositories. Refer to the Airbyte GitHub source documentation for more information on how to set up a GitHub source in Airbyte.
Once all three sources have been set up successfully, the sources screen should look like this:

Next, we’ll set up a Snowflake destination. Airbyte offers a Snowflake destination that makes it easy to load and normalize data in Snowflake. We’ll need to configure only one Snowflake destination in Airbyte. The configuration we’ll use will be close to the default suggested by the Snowflake destination setup guide:
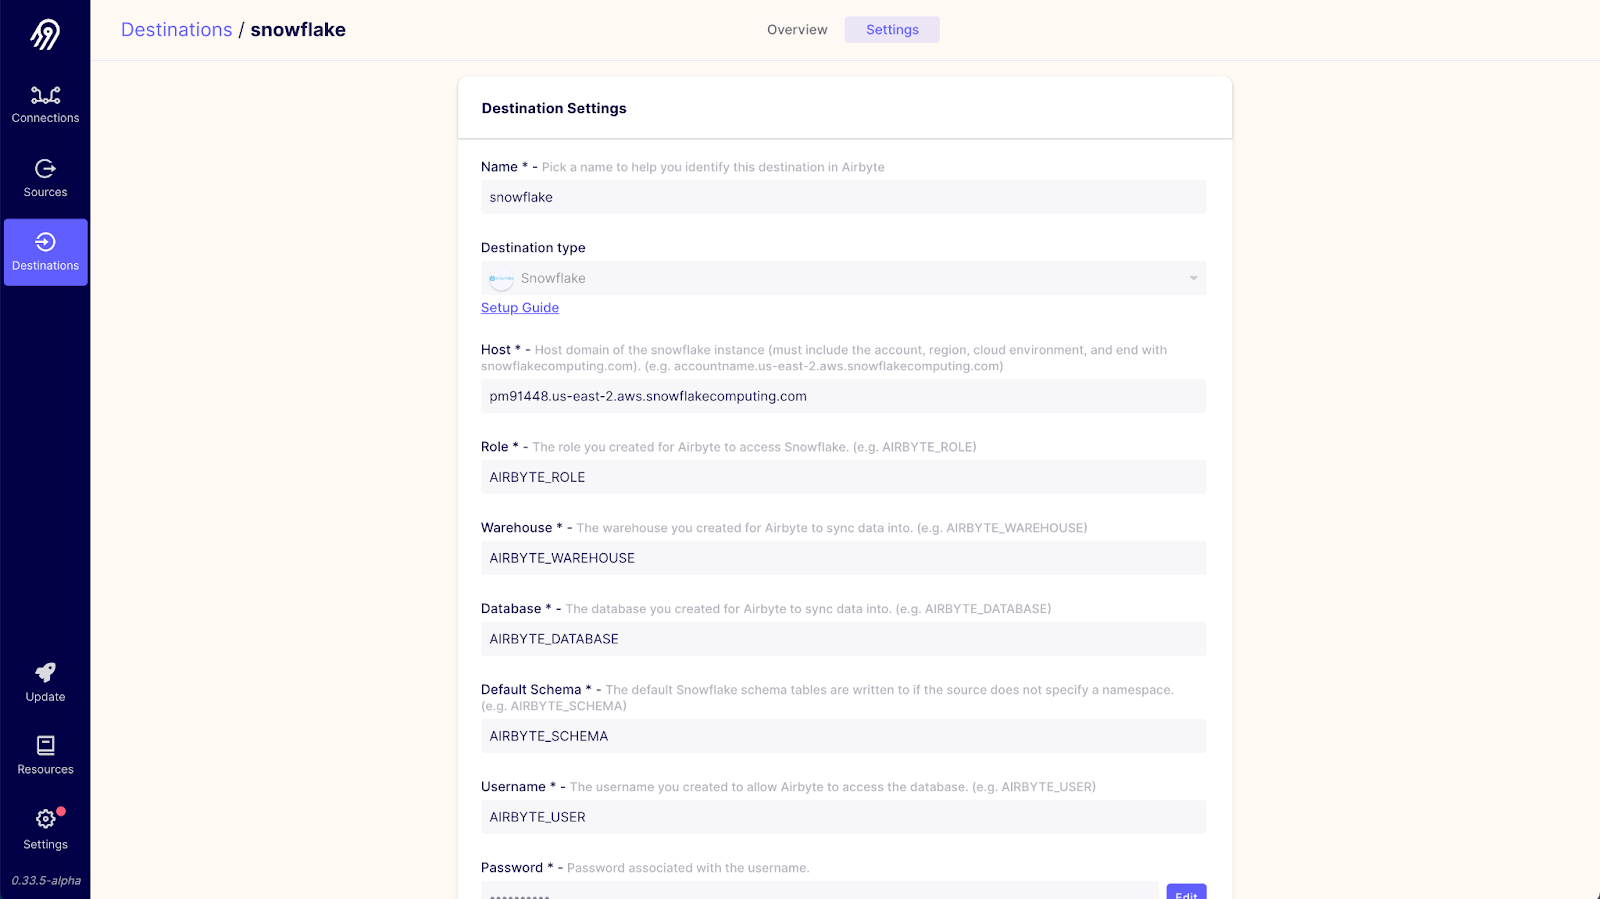
If you made any changes to the setup script, then those changes should be reflected here. You can find more information in the Airbyte Snowflake destination setup documentation.
We’ll need three separate connections to load data for each repository into Snowflake. When creating a connection you’ll need to select one of the existing GitHub sources and the Snowflake destination. For each connection, we’ll set the sync frequency to manual since the Prefect flow that we create will be triggering the flow for us. We’ll also select only commits and issues as the data that we’ll sync from GitHub to reduce the amount of data we’re syncing to only what’s necessary. The configuration for one of the connections will look like this:

Once all three connections are configured, you should be able to see all three connections in the Airbyte dashboard like so:

Now that our Airbyte connections are all set up, we need to set up a dbt project to transform our loaded data within Snowflake. You might be asking yourself, why do we need to use a separate dbt project and Prefect if Airbyte already supports transformations via dbt? We are able to normalize/transform data during our Airbyte connection synchronizations, but each of those transformations applies only to the data fetched by that connection. If we want to transform data on a schedule across multiple connections, Prefect can help with that.
An example dbt project for this recipe can be found here. Feel free to clone and tweak the repository to suit your use case. In order to run the models in this dbt project, you’ll need to configure a dbt profile with the information necessary to connect to your Snowflake instance.
With this dbt project, we’ll create two models: common_commiters and common_issue_submitters. These will create views in Snowflake containing the committers and issues submitters that are common across all three repositories. We’ll then be able to query these views to easily determine common contributors.
To tie everything together and put our ELT pipeline on a schedule we’ll create a Prefect flow. Prefect flows are collections of tasks or distinct units of work that are orchestrated by Prefect to create robust ELT pipelines. We’ll be using Prefect Cloud as the orchestrator for our flow. Prefect Cloud has a generous free tier so there will be no cost incurred when implementing this recipe. I recommend setting up a Prefect Cloud account and you can follow the steps outlined in the Prefect docs in order to set up and authenticate to your account. For this recipe, we’ll be using a project in Prefect Cloud named “Airbyte Recipe”. You can create this project in your tenant via the Prefect Cloud UI.
Within the Prefect flow, we’ll be leveraging several tasks from the Prefect Task Library. The Prefect Task Library allows you to quickly create flows by leveraging tasks created by Prefect and the community and cuts down on the amount of code that you need to write. For this flow we’ll leverage the three tasks: AirbyteConnectionTask, DbtShellTask and SnowflakeQuery. you can find the whole code of the flow.py script here.
The AirbyteConnectionTask accepts the hostname, port, and API version for an Airbyte server along with a connection ID in order to trigger and then wait for the completion of an Airbyte connection.
The DbtShellTask allows us to configure and execute a command via the dbt CLI. For this recipe, we specify that our Airbyte sync tasks are all upstream tasks to our dbt run task to ensure that the dbt run task only executes after the three Airbyte syncs have been completed.
With the SnowflakeQuery task we can execute SQL queries against a Snowflake warehouse. We’ll be using this task to get our final results.
You’ll also notice that we use a PrefectSecret task as part of our flow. That’s to make sure that our flow can use our Snowflake password in a safe and secure way. We’ll be running this flow locally, so you can set the secret in your .prefect/config.toml file in the following manner:
In order to run the Prefect flow using Prefect Cloud we’ll need to register it first. When a flow is registered, Prefect constructs a DAG that defines how the flow will be executed. For the flow in this recipe, the DAG looks like this:

We can register our flow with Prefect Cloud using the command prefect register --project "Airbyte Recipe" -p prefect/flow.py. Once the flow is registered, you’ll be able to see the flow listed in the Prefect Cloud UI:

In order to run our Prefect flow, we’ll also need to run an agent and register it with Prefect Cloud. Since we’re using local storage for this flow (we’ll be executing code directly on our machine) we’ll also spin up a local agent to execute our flow. You can find more information about agents and storage in the Prefect documentation. To run an agent locally, we’ll run the command prefect agent local start. Once the agent has started, you’ll be able to see the agent in the Prefect Cloud UI:

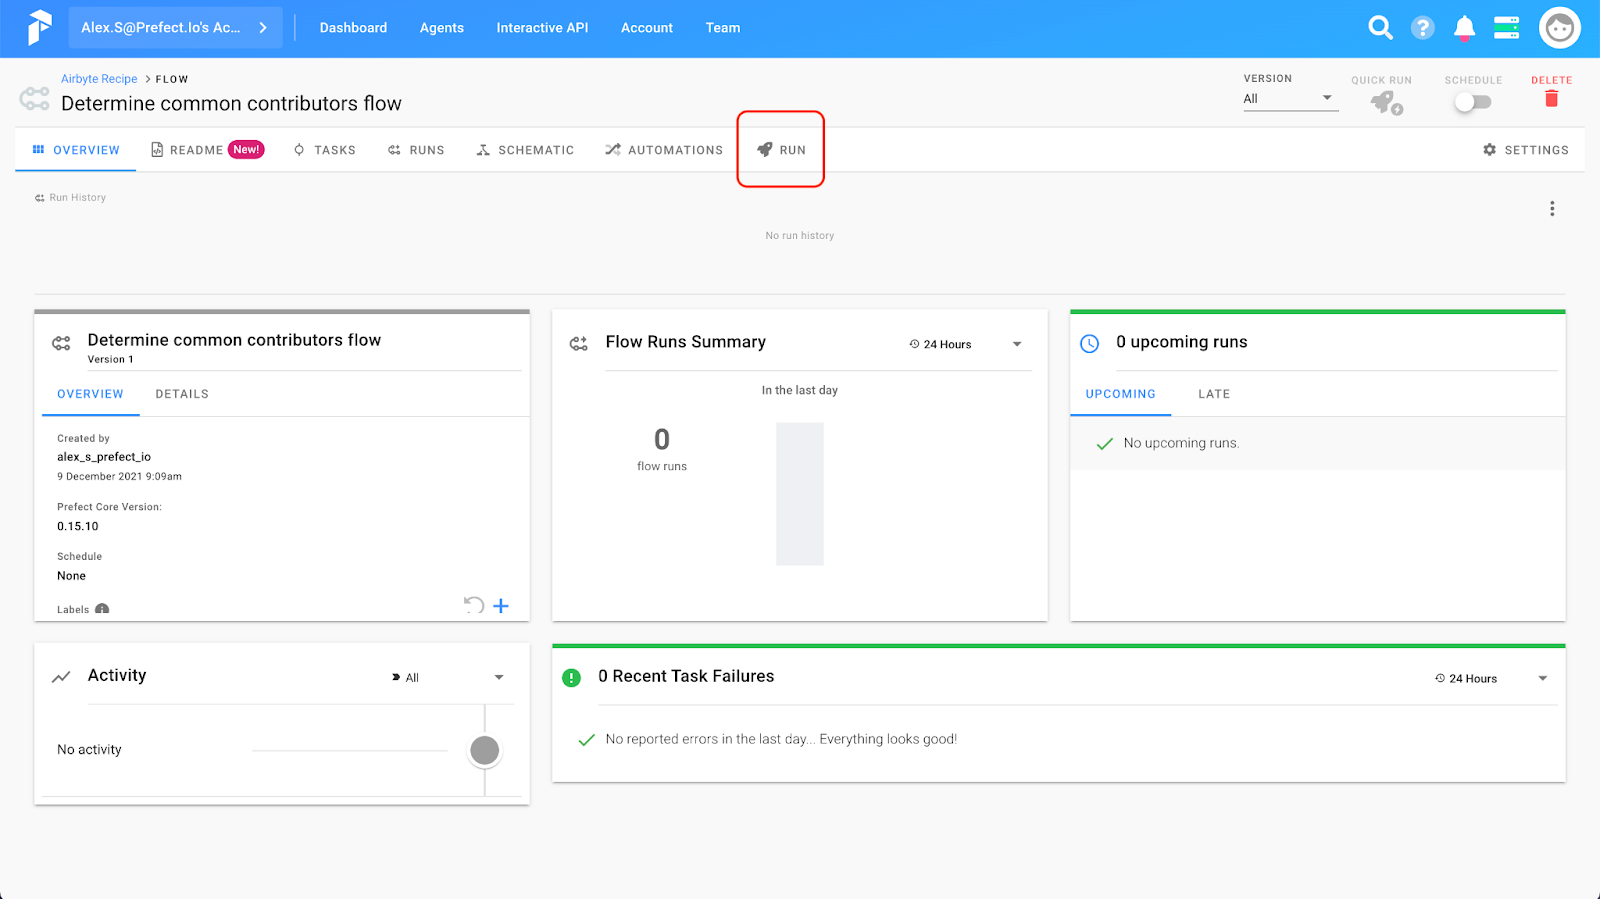
Everything is in place now to run our flow!
To run our flow, navigate to the flow page and hit the Run button:
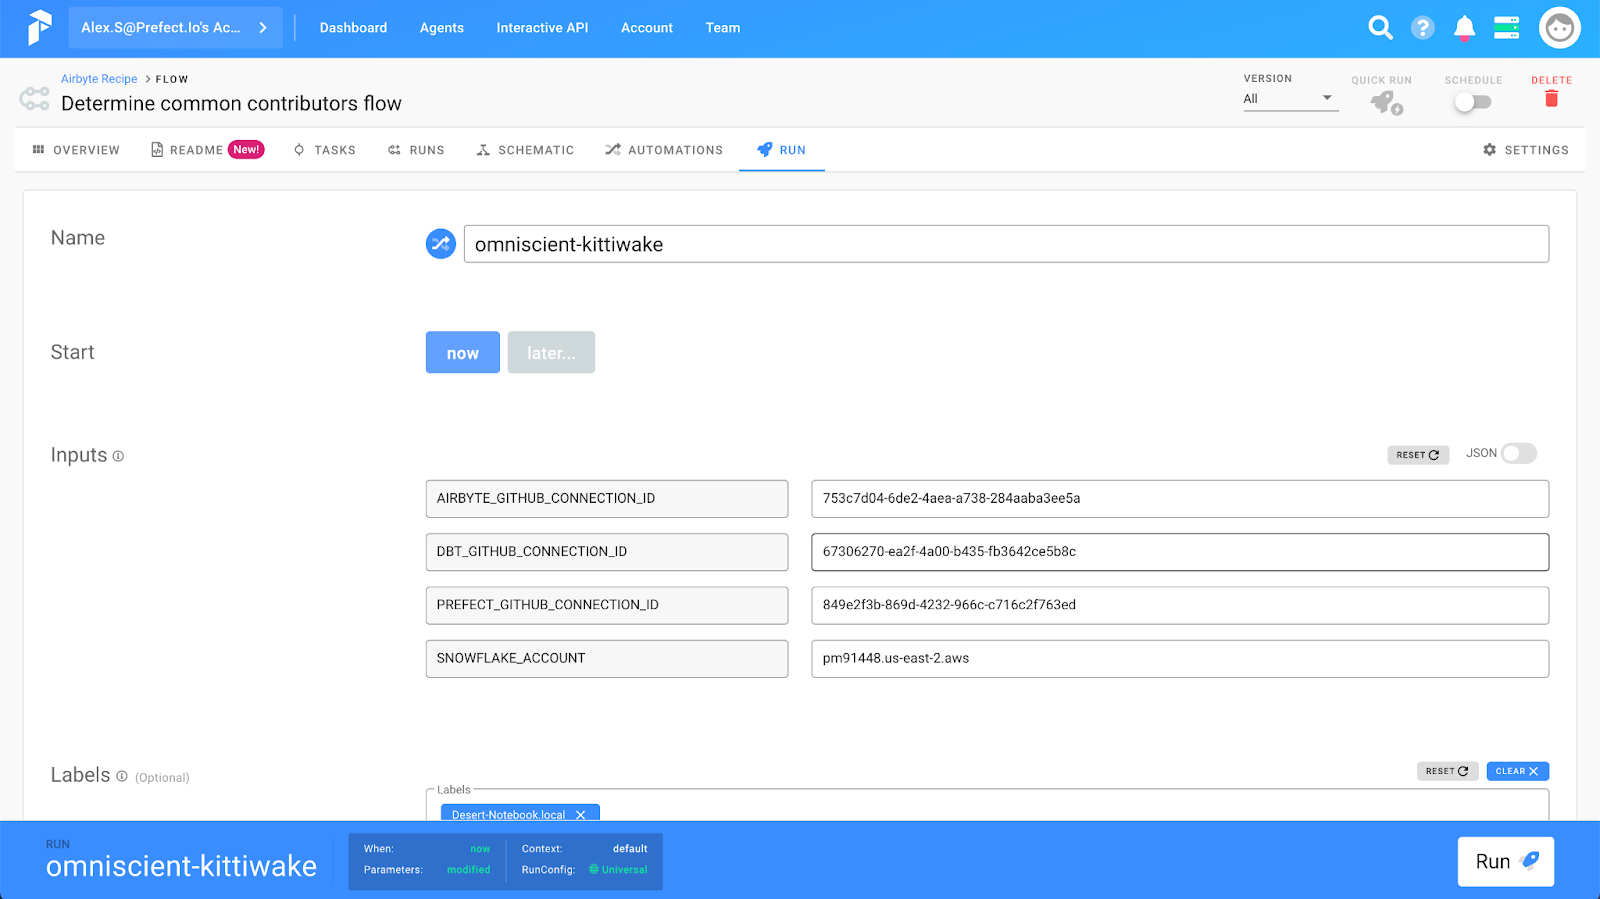
On the next screen we’ll be able to set the parameters for our flow. We’ll need to define our Airbyte connection IDs and Snowflake account name for our flow to run:
Once you hit the run button you’ll be taken to the flow run screen and get to watch in real-time as your flow runs! Hopefully, it will look something like this:

If we look at the artifact generated by this flow run, we’ll get our answer to who are the common contributors to Prefect, Airbyte, and dbt. Drumroll please…
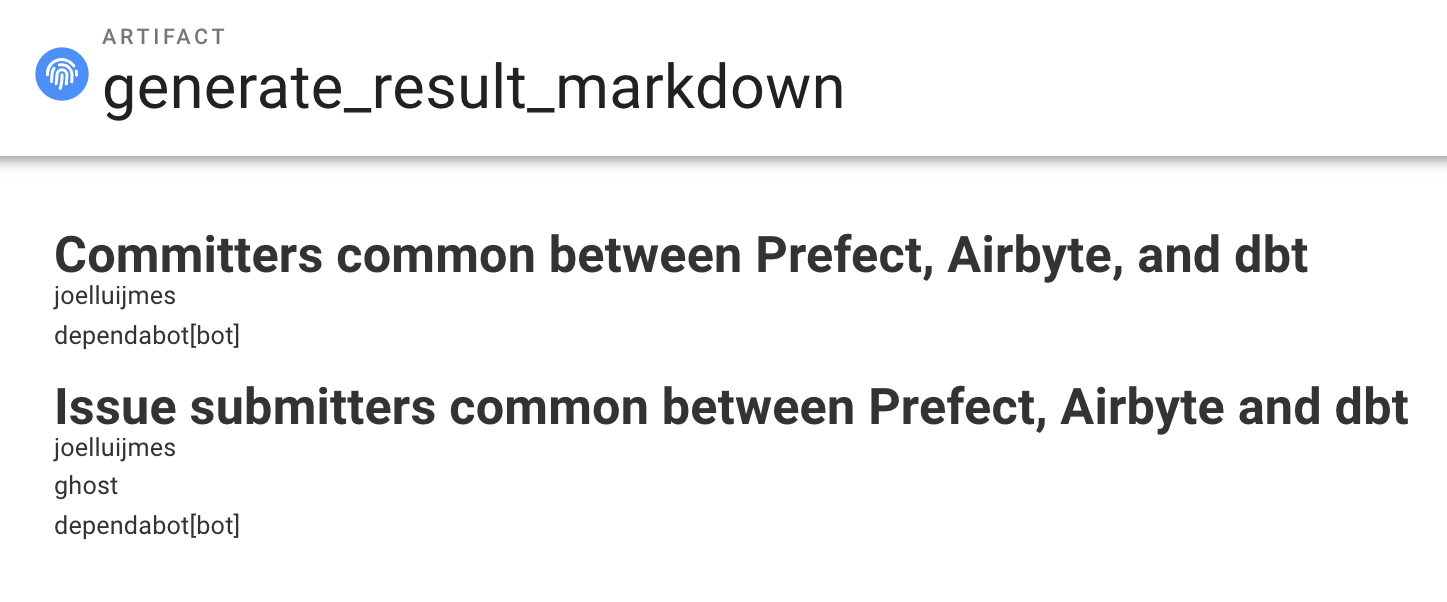
It looks like joelluijmes is the only human contributor common between the three repositories. Congratulations to joelluijmes! That’s an impressive achievement!
We did it! We were able to answer our question of who are the common committers to Prefect, Airbyte, and dbt by replicating data with Airbyte, transforming the data with dbt, and orchestrating the whole ELT pipeline with Prefect.
This only scratches the surface of how we can use Airbyte and Prefect together. There’s more data that we could pull from GitHub to produce other interesting results. We could find common stargazers across repositories and visualize it with a Venn diagram. We could also use Prefect’s advanced scheduling capabilities to create a dashboard of GitHub activity for repositories over time.

Prefect Cloud offers the ability to schedule on an interval or with a cron expression via the UI and custom parameters can be defined for each schedule. This allows us to create one flow that can potentially be used across multiple applications through the adjustment of parameters. More scheduling options are also available through the core Prefect engine and you can find out more about those in the Prefect documentation.
When we combine the best parts of multiple tools, we can really create something special. We can’t wait to see what you’ll build!
Happy engineering!
Alexander Streed is a Senior Software Engineer at Prefect.


Download our free guide and discover the best approach for your needs, whether it's building your ELT solution in-house or opting for Airbyte Open Source or Airbyte Cloud.


Learn how to build a connector development support bot for Slack that knows all your APIs, open feature requests and previous Slack conversations by heart


Learn to replicate data from Postgres to Snowflake with Airbyte, and compare replicated data with data-diff.
Learn how to build an ELT pipeline to discover GitHub users that have contributed to the Prefect, Airbyte, and dbt repositories.