

Airtable is a cloud collaboration service.
Snowflake Data Cloud is a cloud-based data warehousing and analytics platform that allows organizations to store, manage, and analyze large amounts of data in a secure and scalable manner. It provides a single, integrated platform for data storage, processing, and analysis, eliminating the need for multiple tools and systems. Snowflake Data Cloud is built on a unique architecture that separates compute and storage, allowing users to scale up or down as needed without affecting performance. It also offers a range of features such as data sharing, data governance, and machine learning capabilities, making it a comprehensive solution for modern data management and analytics.

1. Open the Airbyte dashboard and click on "Sources" on the left-hand side of the screen.
2. Click on the "New Source" button in the top right corner of the screen.
3. Select "Airtable" from the list of available sources.
4. Enter a name for your Airtable source connector.
5. Enter your Airtable API key in the "API Key" field. You can find your API key by logging into your Airtable account and navigating to the "Account" section of your profile.
6. Enter the base ID of the Airtable base you want to connect to in the "Base ID" field. You can find the base ID by navigating to the "Help" menu in your Airtable base and selecting "API documentation."
7. Click the "Test" button to ensure that your credentials are correct and that Airbyte can connect to your Airtable base.
8. If the test is successful, click the "Create" button to save your Airtable source connector.
9. You can now use your Airtable source connector to create a new Airbyte pipeline and start syncing data from your Airtable base to your destination of choice.
1. First, you need to have a Snowflake Data Cloud account and the necessary credentials to access it.
2. Once you have the credentials, go to the Airbyte dashboard and click on "Sources" on the left-hand side of the screen.
3. Click on the "Create a new source" button and select "Snowflake Data Cloud" from the list of available sources.
4. Enter a name for your Snowflake Data Cloud source and click on "Next".
5. In the "Connection" tab, enter the following information:
- Account name: the name of your Snowflake account
- Username: your Snowflake username
- Password: your Snowflake password
- Warehouse: the name of the warehouse you want to use
- Database: the name of the database you want to use
- Schema: the name of the schema you want to use
6. Click on "Test connection" to make sure that the connection is successful.
7. If the connection is successful, click on "Next" to proceed to the "Configuration" tab.
8. In the "Configuration" tab, select the tables or views that you want to replicate and configure any necessary settings.
9. Click on "Create source" to save your Snowflake Data Cloud source and start replicating data.
With Airbyte, creating data pipelines take minutes, and the data integration possibilities are endless. Airbyte supports the largest catalog of API tools, databases, and files, among other sources. Airbyte's connectors are open-source, so you can add any custom objects to the connector, or even build a new connector from scratch without any local dev environment or any data engineer within 10 minutes with the no-code connector builder.
We look forward to seeing you make use of it! We invite you to join the conversation on our community Slack Channel, or sign up for our newsletter. You should also check out other Airbyte tutorials, and Airbyte’s content hub!
What should you do next?
Hope you enjoyed the reading. Here are the 3 ways we can help you in your data journey:


Ensuring data is easily accessible to all business teams is crucial for informed decision-making and staying competitive. If your organization uses Airtable for organizing and collaborating on data, syncing data from Airtable to Snowflake will provide you with multiple benefits. This will help enhance data management, streamline workflows better, and gain meaningful insights from your data. As a result, you can work towards informed decision-making for improving business growth.
Let’s look into how you can sync data between these two platforms.
What is the Need for Migrating Your Data from Airtable to Snowflake?
Airtable, a cloud-based platform for creating and sharing relational databases, combines the elements of a traditional spreadsheet with the capabilities of a database. You can use Airtable to organize, manage, and share data for various applications. The platform can be used for different use cases, from inventory tracking and project planning to maintaining employee directories and customer relationship management.
On the other hand, Snowflake is a cloud-based data warehousing platform that runs on major cloud platforms like AWS, GCP, and Microsoft Azure. This fully managed SaaS provides a single platform for data storage, processing, and analytics. With the automatic scalability of its compute resources, you can run virtually any number of workloads in parallel without worrying about resource contention.
Syncing data from Airtable to Snowflake is associated with certain benefits, including:
- Data Centralization: You can centralize data from multiple sources, including Airtable, in Snowflake. Centralizing data into a single, scalable platform helps maintain better data consistency.
- Utilize Advanced Analytics Tools: Snowflake is compatible with many BI and analytics tools; this allows you to utilize advanced analytics capabilities that aren’t available in Airtable.
How to set up Airtable to Snowflake Data Sync with Airbyte?
Airbyte, a popular data integration platform, allows you to extract data from different sources and load it into any supported destination. With 350+ pre-built connectors, including popular databases, data warehouses, SaaS applications, and other data storage solutions, Airbyte simplifies the process of integrating data from multiple sources.
Pre-requisites
Before you get started with the data syncing process of Airtable to Snowflake using Airbyte, here’s a list of prerequisites to ensure a smooth setup:
- An active Airtable account.
- Personal Access Token (if you’re using this instead of OAuth) for authentication of your Airtable account.
- A Snowflake account with ACCOUNTADMIN role.
- Optional: An AWS or GCS for data loading in Snowflake.
Step 1: Set Up an Airtable Source
Log in to Airbyte Cloud. After you’re redirected to the Airbyte dashboard, click on Sources on the left-side navigation bar. Use the Search bar to find the Airtable connector. Click on the connector when you see it in the search results.
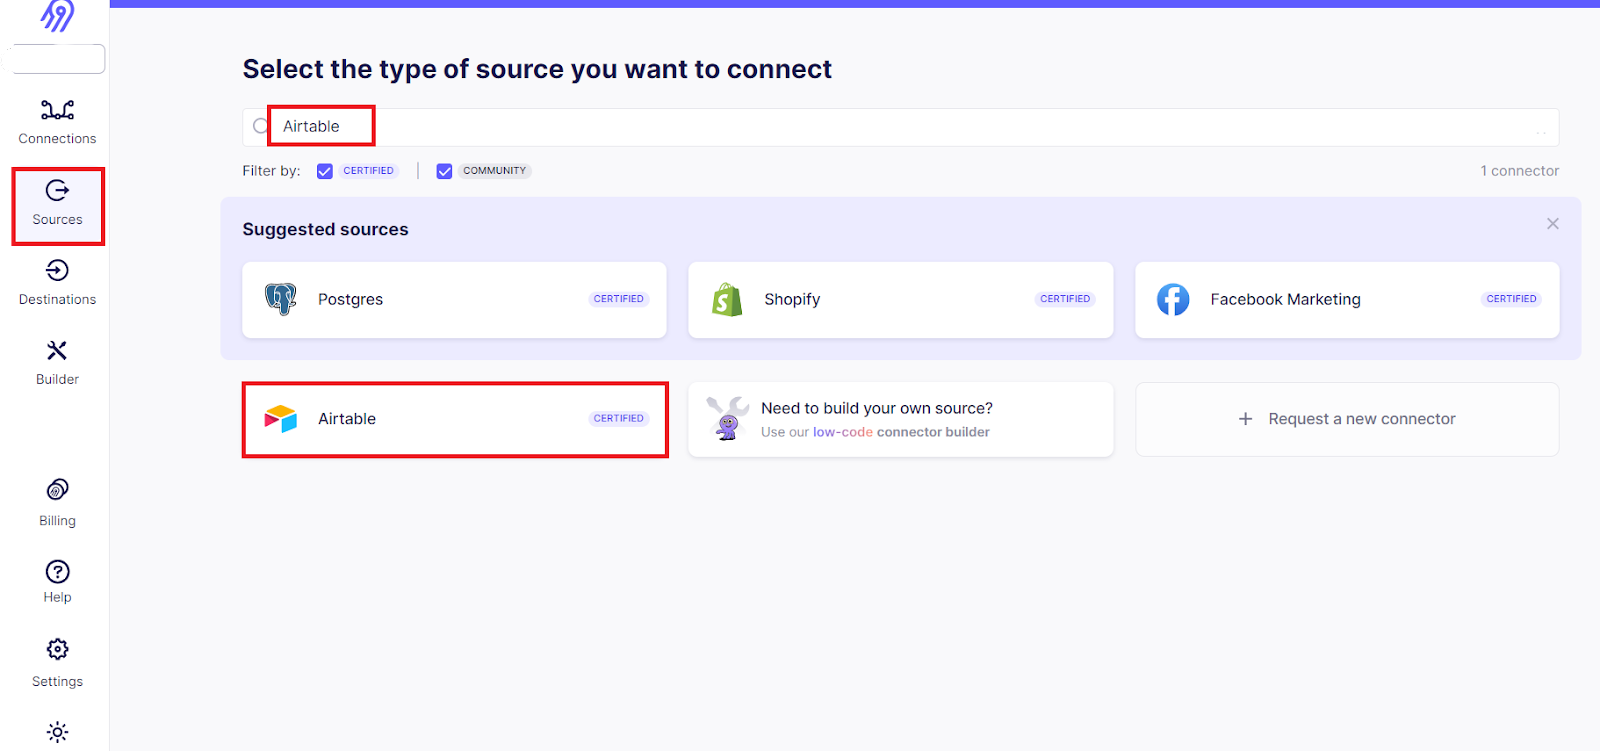
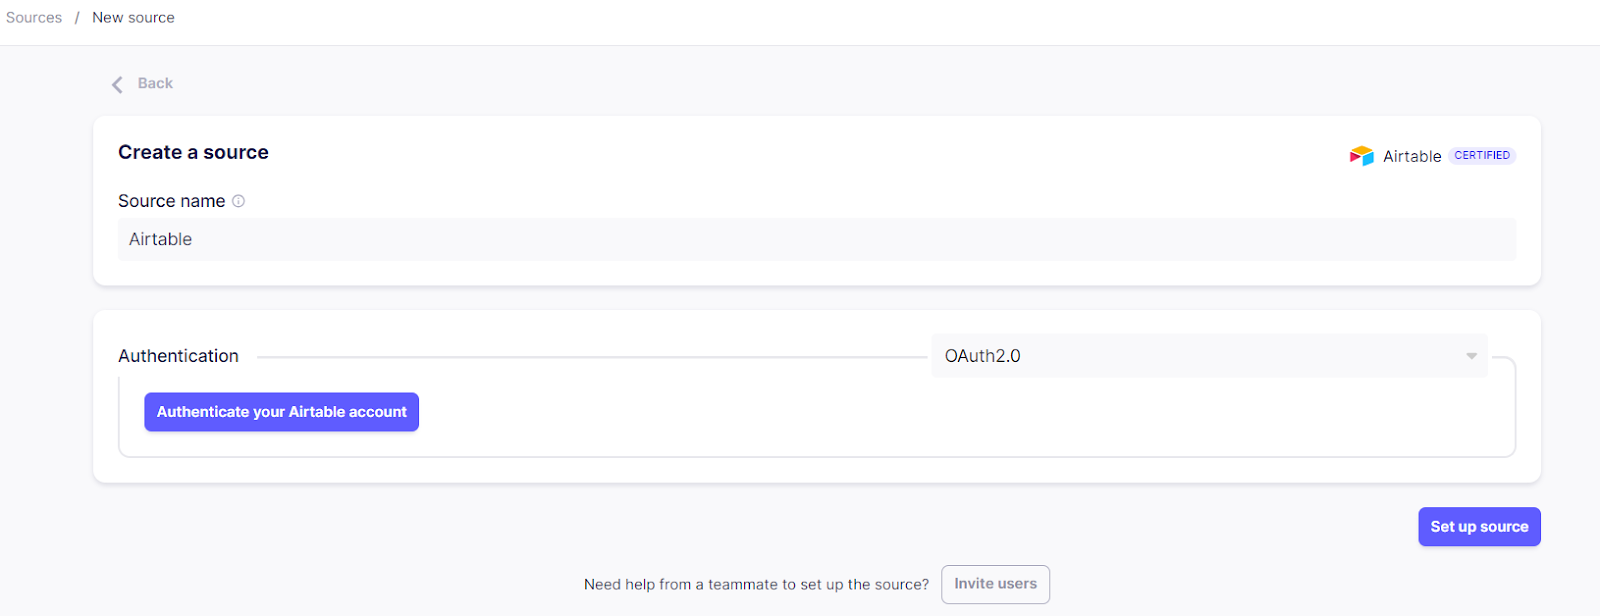
On the New Source page, provide a Source name to help identify this source in Airbyte. You can use OAuth or a Personal Access Token to authenticate your Airtable account.
- Select OAuth2.0 from the Authentication dropdown to authenticate using OAuth. Then click on Authenticate your Airtable account to sign in with Airtable. After you select the required workspaces to sync, authorize your account.
- Select Personal Access Token from the Authentication dropdown to authenticate using a Personal Access Token. Enter the Access Token for your Airtable account.
Click on Set up source to finish configuring Airtable as the source.
Look into the Airtable connector documentation for further details on the connector.
Step 2: Set Up a Snowflake Destination
Upon successful completion of the source connector’s configuration, you can proceed to set up the destination in one of two ways:
- Click on Create a connection that appears on the Connections page following a successful source connector setup.
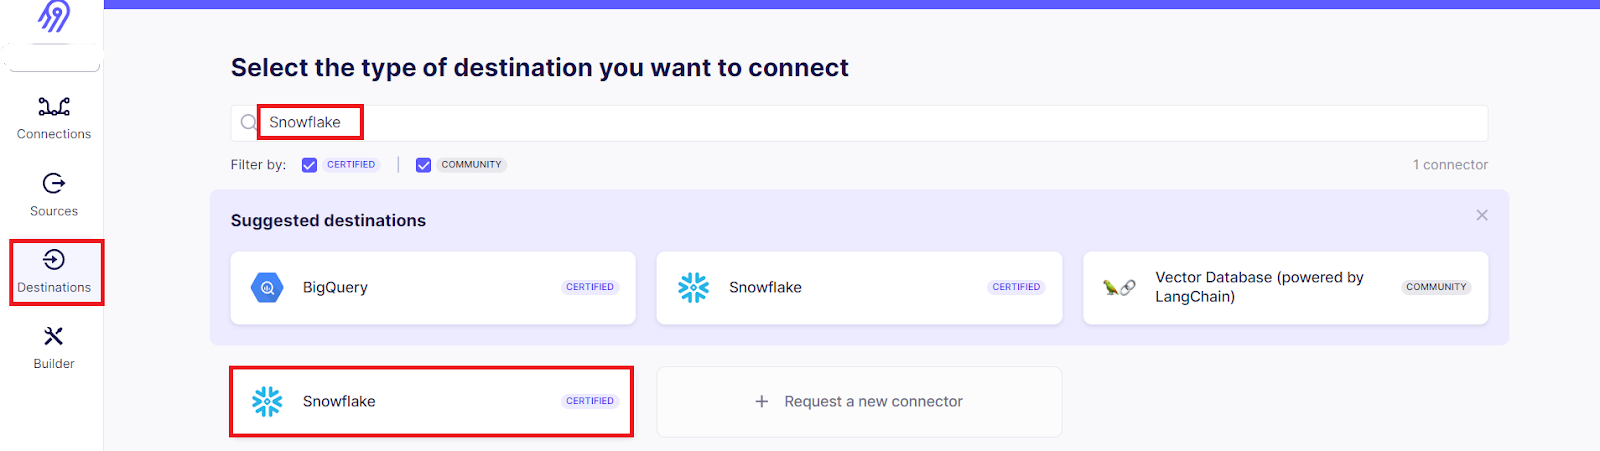
- Click on Destinations on the left-side navigation bar.
Use the Search bar to look for the Snowflake connector. When you see the connector in the search results, click on it.
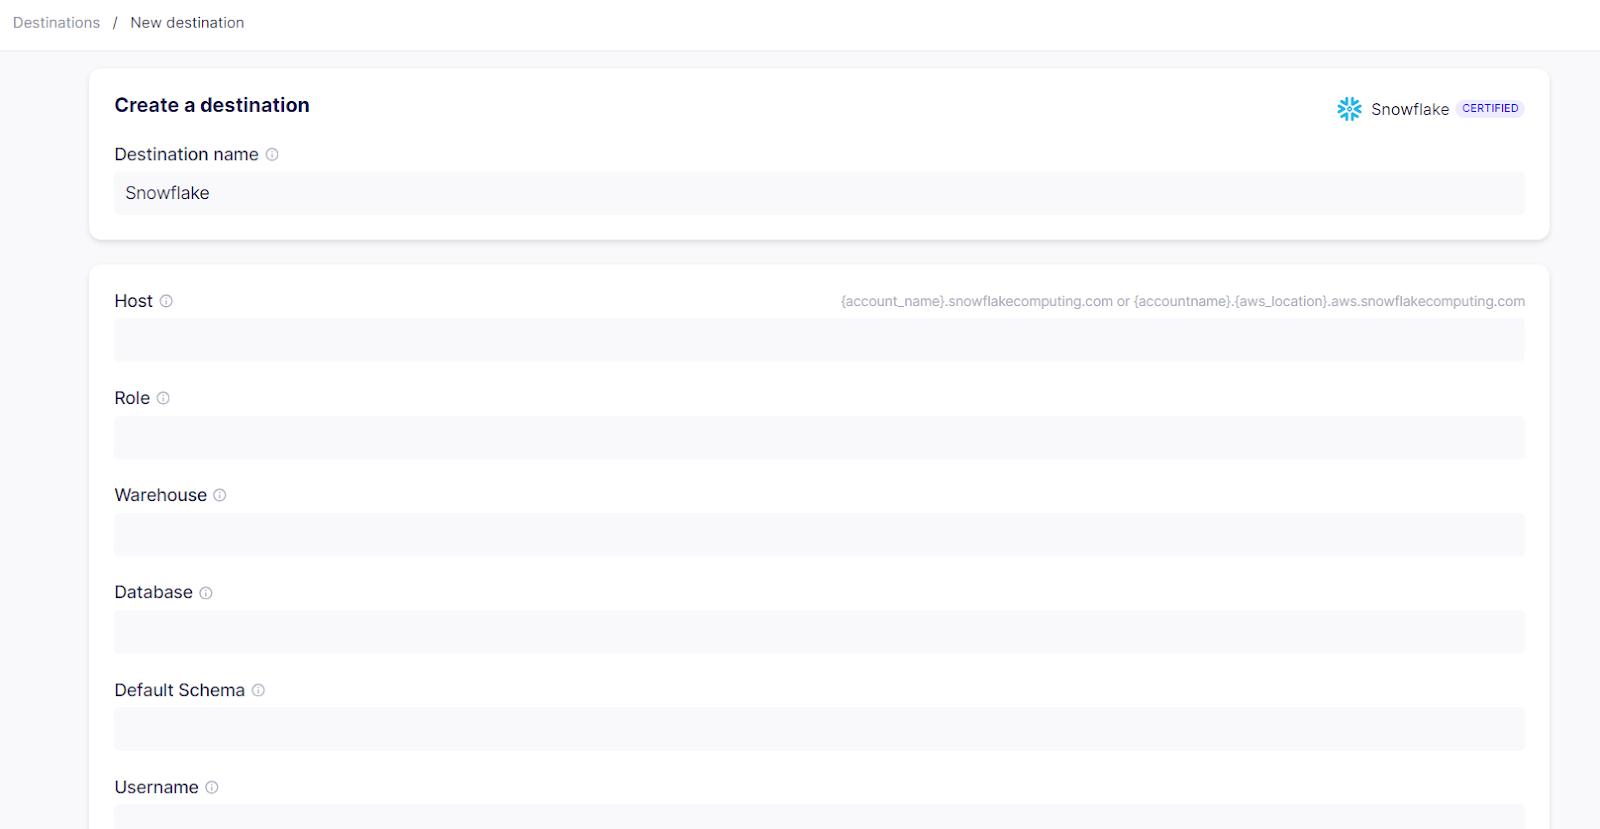
On the New destination setup page, provide a unique Destination name to help you identify this destination in Airbyte. Specify the Host, Role, Warehouse, Database, Default Schema, and Username details. For the Authorization Method, you can choose OAuth2.0, Key Pair Authentication, or Username and Password.
While Airbyte uses Snowflake’s Internal Stage to load data by default, you can also use an Amazon S3 bucket or Google Cloud Storage bucket. You must ensure the database and schema have the USAGE privilege.
After specifying all the required details, click on Set up destination.
For additional information on this connector, refer to the Snowflake connector documentation.
Step 3: Configure a Connection from Airtable to Snowflake
If you select Create a connection after a successful source setup, you will be redirected to the New connection page upon completing the destination setup.
However, if you had manually navigated to the Destinations option, you must select Connections from the left-side navigation bar as the next step. Select the Airtable source and Snowflake destination created in the previous steps.
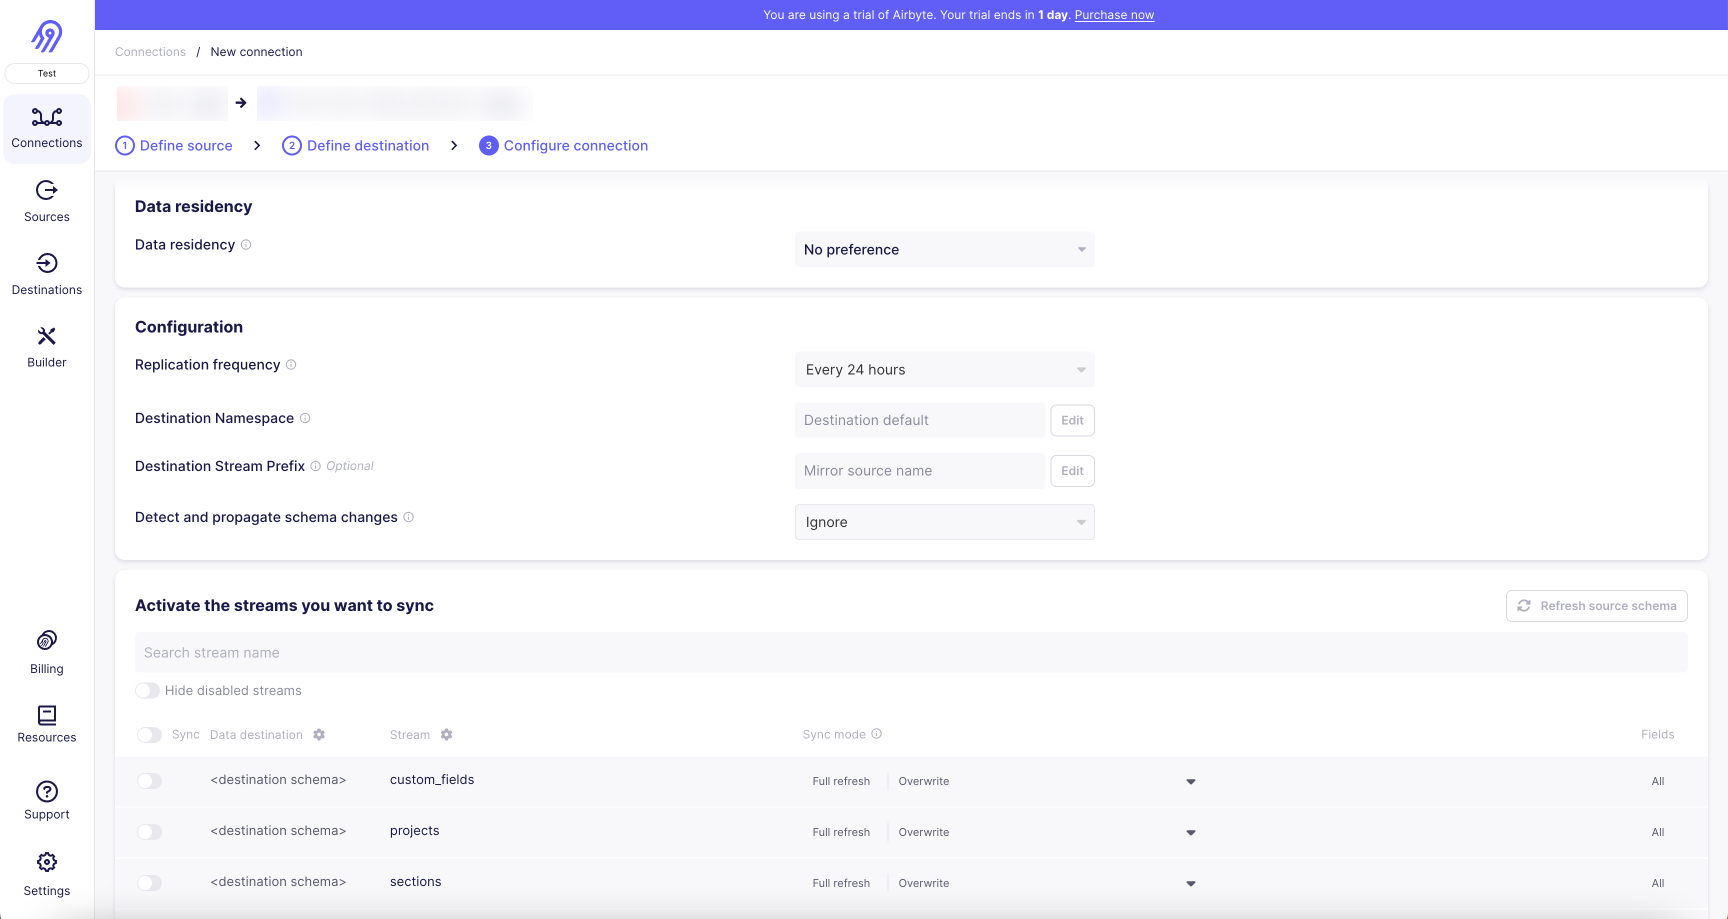
Provide a unique Connection name and select the Schedule type as Scheduled, Manual, or Cron. Some other Configuration options you can change include Replication frequency, Destination Namespace, Destination Stream Prefix, and Detect and propagate schema changes.
In the Activate the streams you want to sync section, you can select which streams to sync and how they’re loaded to the destination. The Snowflake destination supports the following sync modes:
- Full Refresh - Overwrite
- Full Refresh - Append
- Incremental Sync - Append
- Incremental Sync - Append + Deduped
Click on Set up connection to complete the process. This will successfully sync your data from Airtable to Snowflake.
How to migrate Data from Airtable to Snowflake Using CSV Files?
This manual method involves exporting data from Airtable as CSV files, then importing these files into Snowflake and modifying your data according to your requirements.
Step 1: Export Airtable Data as CSV Files
On the Airtable dashboard, open up the view menu and click on the name of the view. Then, select the Download CSV option from the dropdown menu. The CSV file of your view will download to the default location of your local system.

Step 2: Import the CSV Files into Snowflake
To upload the CSV files to Snowflake, you can use the Classic Console. Here are the steps to follow for uploading data:
- Identify the location of your data files. In this case, it is from your local machine.
- Determine the size of your data files. You can load files of up to 50 MB each. For larger files or large numbers of files, use SnowSQL instead.
- Select Databases in the Classic Console, followed by selecting a specific database and schema.
- Select the Tables tab and locate the table to which you want to load data.
- Either select a table name to open the table details page, followed by Load Table, or select a table row followed by Load Data. Next, select Load Table; this will open the Load Data wizard.
- From the dropdown that will include any warehouse on which you have the USAGE privilege, select a warehouse to use to load data into the table. Then, select Next.
- Select the Load files from your computer option. Click on Select Files to browse the files you want to load.
- Select one or more local data files, followed by Open. Then, click on Next.
- To finish loading data, select an existing named file format from the dropdown list or create one.
- Click on OK to close the Load Data wizard.
This will complete the manual Airtable to Snowflake data sync.
This two-step manual sync using CSV files is suitable for scenarios such as:
- One-Time Data Replication: If you require a one-time transfer of Airtable data to Snowflake, the manual technique is more efficient than setting up an automated pipeline.
- Small Amount of Data: For smaller datasets with limited complexity, the manual method using CSV files is an easy solution.
Here are the drawbacks associated with using CSV files for the data sync process:
- Time-Consuming: The manual export, transformation (if required), and import of data is a time-consuming process, particularly for large datasets.
- Effort-Intensive: The method requires significant manual efforts, especially for regular exporting and importing of data.
- No Real-Time Data Sync: The delays involved in the export and import of CSV files result in the lack of real-time data synchronization. This may not be suitable for scenarios where up-to-date data is critical.
To overcome these drawbacks, the better alternative is to use an advanced data integration platform like Airbyte. Some of the key features of Airbyte, making it a popular choice for data integration processes, include:
- Automated Data Sync: Airbyte provides you the choice to automate the data synchronization process, reducing the need for manual efforts and minimizing the risk of human error.
- Real-Time Data Transfer: Airbyte supports near-real-time data syncing. This is crucial if your business requires the latest data for analysis and decision-making.
- Customizable Sync Frequencies: You can configure the frequency of data syncs based on your business needs.
- Scalability: As your data volumes grow, Airbyte automatically scales to handle the increased volumes and complexities.
Summing It Up
Syncing data from Airtable to Snowflake can help enhance your organization’s data management and analytics capabilities.
To perform this data sync, the two different methods include using Airbyte and using CSV files. The use of CSV files involves several drawbacks like being time-consuming, effort-intensive, and lacking real-time data sync capabilities. Instead, using Airbyte can help overcome these drawbacks.
What should you do next?
Hope you enjoyed the reading. Here are the 3 ways we can help you in your data journey:
Should you build or buy your data pipelines?
Download our free guide and discover the best approach for your needs, whether it's building your ELT solution in-house or opting for Airbyte Open Source or Airbyte Cloud.

Ready to get started?
Frequently Asked Questions
Airtable's API provides access to a wide range of data types, including:
1. Tables: The primary data structure in Airtable, tables contain records and fields.
2. Records: Each row in a table is a record, which contains data for each field.
3. Fields: Each column in a table is a field, which can contain various data types such as text, numbers, dates, attachments, and more.
4. Views: Airtable allows users to create different views of their data, such as grid view, calendar view, and gallery view.
5. Forms: Airtable also allows users to create forms to collect data from external sources.
6. Attachments: Users can attach files to records, such as images, documents, and videos.
7. Collaborators: Airtable allows users to collaborate with others on their data, with different levels of access and permissions.
8. Metadata: Airtable's API also provides access to metadata about tables, fields, and records, such as creation and modification dates.
Overall, Airtable's API provides a comprehensive set of data types and features for users to manage and manipulate their data in a flexible and customizable way.