Aggregating Data from MySQL and Postgres into BigQuery with Airbyte
Experience the synergy of Airbyte, dbt, and Dagster as we extract from Postgres and MySQL, transform, and load into BigQuery with ease.
Welcome to the "Multisource Database Aggregation" repository! This repo provides a quickstart template for building a full data stack that aggregates data from multiple databases and data sources using Airbyte and loads the aggregated data in a preferred data warehouse. In this quickstart, we will easily extract data from Postgres and MySQL tables, load it into BigQuery, and apply necessary transformations in the BigQuery dataset using dbt.
The data aggregation with Airbyte and transformations with dbt are orchestrated seamlessly with Dagster. While this template doesn't delve into specific data or transformations, its goal is to showcase the synergy of these tools.
Like other quickstarts, this is designed to minimize setup hassles and propel you forward.
Infrastructure Layout
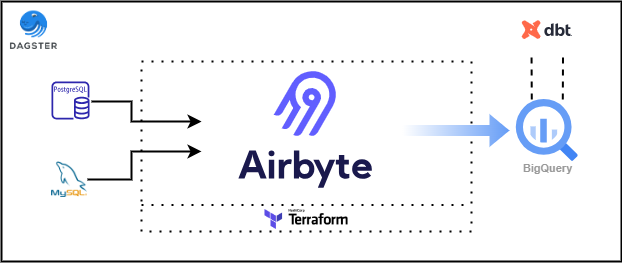
Dagster Pipeline DAG

Prerequisites
Before you embark on this integration, ensure you have the following set up and ready:
- Python 3.10 or later: If not installed, download and install it from Python's official website.
- Docker and Docker Compose (Docker Desktop): Install Docker following the official documentation for your specific OS.
- Airbyte OSS version: Deploy the open-source version of Airbyte. Follow the installation instructions from the Airbyte Documentation.
- Terraform: Terraform will help you provision and manage the Airbyte resources. If you haven't installed it, follow the official Terraform installation guide.
1. Setting an environment for your project
Get the project up and running on your local machine by following these steps:
1. Clone the repository (Clone only this quickstart):
2. Navigate to the directory:
3. Set Up a Virtual Environment:
For Linux and Mac:
For Windows:
4. Install Dependencies:
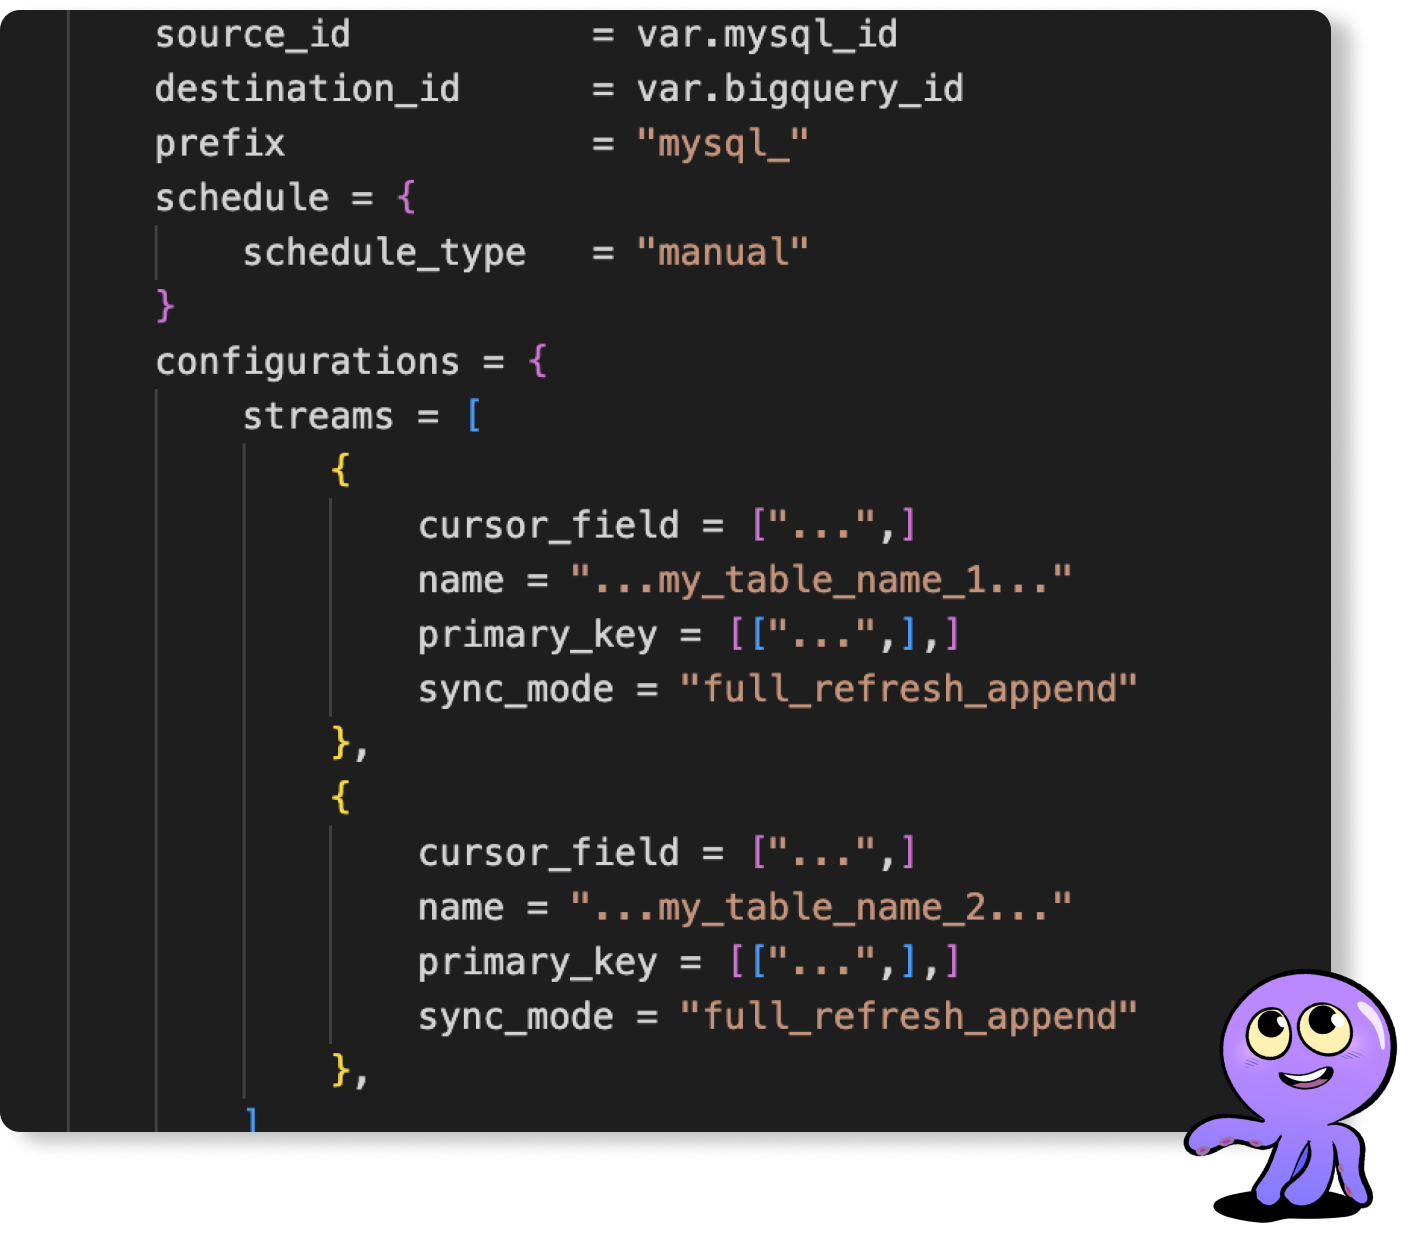
2. Setting Up Airbyte Connectors with Terraform
Airbyte allows you to create connectors for sources and destinations, facilitating data synchronization between various platforms. In this project, we're harnessing the power of Terraform to automate the creation of these connectors and the connections between them. Here's how you can set this up:
1. Navigate to the Airbyte Configuration Directory:
Change to the relevant directory containing the Terraform configuration for Airbyte:
2. Modify Configuration Files:
Within the infra/airbyte directory, you'll find three crucial Terraform files:
- provider.tf: Defines the Airbyte provider.
- main.tf: Contains the main configuration for creating Airbyte resources.
- variables.tf: Holds various variables, including credentials.
You'll also find three crucial Terraform modules:
- connections: Contains the configuration files for the Airbyte connections.
- destination_warehouse: Contains the configuration files for the Airbyte destination connector(s).
- source_databases: Contains the configuration files for the Airbyte source connector(s).
In each terraform module, you will find the following Terraform configuration files:
- provider.tf: Defines the Airbyte provider.
- main.tf: Contains the main configuration for creating Airbyte resources.
- variables.tf: Holds various variables, including credentials.
- outputs.tf: Defines exported data or metadata about your resources.
Adjust the configurations in these files to suit your project's needs. Specifically, provide credentials for your Postgres, MySQL and BigQuery connections. You can utilize the variables.tf files to manage these credentials.
3. Initialize Terraform:
This step prepares Terraform to create the resources defined in your configuration files.
4. Review the Plan:
Before applying any changes, review the plan to understand what Terraform will do.
5. Apply Configuration:
After reviewing and confirming the plan, apply the Terraform configurations to create the necessary Airbyte resources.
6. Verify in Airbyte UI:
Once Terraform completes its tasks, navigate to the Airbyte UI. Here, you should see your source and destination connectors, as well as the connection between them, set up and ready to go.
3. Setting Up the dbt Project
dbt (data build tool) allows you to transform your data by writing, documenting, and executing SQL workflows. Setting up the dbt project requires specifying connection details for your data platform, in this case, BigQuery. Here’s a step-by-step guide to help you set this up:
1. Navigate to the dbt Project Directory:
Change to the directory containing the dbt configuration:
2. Update Connection Details:
You'll find a profiles.yml file within the directory. This file contains configurations for dbt to connect with your data platform. Update this file with your BigQuery connection details.
3. Utilize Environment Variables (Optional but Recommended):
To keep your credentials secure, you can leverage environment variables. An example is provided within the profiles.yml file.
4. Test the Connection:
Once you’ve updated the connection details, you can test the connection to your BigQuery instance using:
If everything is set up correctly, this command should report a successful connection to BigQuery.
4. Orchestrating with Dagster
Dagster is a modern data orchestrator designed to help you build, test, and monitor your data workflows. In this section, we'll walk you through setting up Dagster to oversee both the Airbyte and dbt workflows:
Navigate to the Orchestration Directory:
Switch to the directory containing the Dagster orchestration configurations:
Set Environment Variables:
Dagster requires certain environment variables to be set to interact with other tools like dbt and Airbyte. Set the following variables:
Note: The AIRBYTE_PASSWORD is set to password as a default for local Airbyte instances. If you've changed this during your Airbyte setup, ensure you use the appropriate password here.
Launch the Dagster UI:
With the environment variables in place, kick-start the Dagster UI:
Access Dagster in Your Browser:
Open your browser and navigate to http://127.0.0.1:3000. There, you should see assets for both Airbyte and dbt. To get an overview of how these assets interrelate, click on "view global asset lineage". This will give you a clear picture of the data lineage, visualizing how data flows between the tools.
Next Steps
Once you've set up and launched this initial integration, the real power lies in its adaptability and extensibility. Here’s a roadmap to help you customize and harness this project tailored to your specific data needs:
Add more Data(base) sources:
You can add more databases or data sources from Airbyte's source catalogue. To do this, edit the Terraform source_databases module and create a new connection in the connections module for each source added.
Create dbt Sources for Airbyte Data:
Your raw data extracted via Airbyte can be represented as sources in dbt. Start by creating new dbt sources to represent this data, allowing for structured transformations down the line.
Add Your dbt Transformations:
With your dbt sources in place, you can now build upon them. Add your custom SQL transformations in dbt, ensuring that you treat the sources as an upstream dependency. This ensures that your transformations work on the most up-to-date raw data.
Execute the Pipeline in Dagster:
Navigate to the Dagster UI and click on "Materialize all". This triggers the entire pipeline, encompassing the extraction via Airbyte, transformations via dbt, and any other subsequent steps.
Extend the Project:
The real beauty of this integration is its extensibility. Whether you want to add more data sources, integrate additional tools, or enhance your transformation logic – the floor is yours. With the foundation set, sky's the limit for how you want to extend and refine your data processes.
Getting started is easy
Start breaking your data siloes with Airbyte